Properly speaking, a knot attaches a line to itself. A bend attaches one line to another and a hitch attaches the line to an object. In describing knots, the rope is said to have a standing part that is made fast to something and a working end, or bitter end, that is free. An open loop like the letters U or C is called a bight.
Thus, to tie a bowline, you would form a bight, twist it to make a loop with the bitter end on top, then pass the bitter end up through the loop, around the standing part, and back down through the loop. A half hitch is a loop and a turn, like when you begin to tie your shoes. It is never used by itself; as the name implies, it is only one component of a proper hitch.
Essential
knots
You can get by just fine with only three knots, one bend, and two hitches. The three knots are the stopper (traditionally a figure eight, although a simple half hitch works better with some types of modern line), the square knot (also called a reef knot) and, most importantly, the bowline. Your basic bend can be the anchor bend or the sheet bend. The essential hitches are the cleat hitch and the round turn with two half hitches. Many more complex knots are merely slight modifications of these. Videos and animations found on the Internet are a good way to learn. A stopper is tied at the bitter end of a line to prevent the line from running free through a fairlead or block. Some assert that every bitter end needs a stopper. Others claim that it is better for certain lines to run free, even when this might not be convenient, as, for example, a jib sheet that must be let go to douse the sail in an emergency. A stopper and a handy knife might be a good compromise.
Square
knot
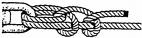
The square knot, or reef knot, is used only when a bowline would be unnecessary and cumbersome. Sail ties around the mainsail take a square knot, for example, as do the lashings that secure pieces of loose gear. It consists of two half hitches in opposite directions.The square knot has two drawbacks. It is easy to tie incorrectly, with both half hitches in the same direction, producing instead a granny knot. Also, it will collapse and let go if tension is applied to only one bitter end. This second drawback becomes a feature when the knot must be easy to untie. It also means that the square knot must never be used as a bend.
A square knot can be tied with the two bitter ends on the same side of the standing parts or on opposite sides. A reef knot is a square knot with its bitter ends on the same side. The other kind of square knot, with bitter ends on opposite sides, is sometimes called a thief knot. When used to secure a ditty bag, it looks much like a reef knot, but the instinct of a thief to retie it as a reef knot will reveal that the bag was opened.
So, how do you tie your shoes? Left over right, make a loop in the right hand, and left over right again? That’s a granny knot with both half hitches in the same direction. No wonder they come untied. A proper square knot would be left over right, make a loop in the left hand, and then right over left. Or else, left over right, make a loop in the right hand, and then left under right. To make an even more secure surgeon’s knot, start the first half hitch with an extra overhand loop, forming a round turn instead of a simple overhand turn.
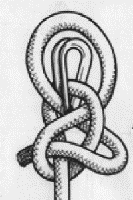
Bowline
Use of a bowline (rhymes with rollin’) is almost always correct but not always convenient. The bowline has many variants: One authority lists more than 50 kinds. The two major variations differ in where the bitter end emerges, whether inside the loop or outside, the latter being called a Dutch bowline. The bowline is identical to a sheet bend, except that a bowline ties the bitter end to the standing part whereas a sheet bend ties two bitter ends together. A bowline can work loose under intermittent loads, particularly if the bitter end is short. (“Leave a tail or it will fail.”)To tie a bowline, form a loop in the standing end and then pass the bitter end up through the side of the loop that has the standing end, around the standing end clockwise, and back down through the loop. If you pass the bitter end up through the side of the loop it is on, it will collapse. If you round the standing end counterclockwise, the bitter end will be outside the loop, forming a weaker Dutch bowline. To tie a sheet bend, form a bight in the thicker line, pass the thinner line through the bight and around both standing end lines, then tuck it under itself.
Cleat
hitch
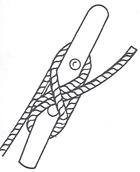
There are at least four ways to attach a line to a cleat, or five if you count the macramé bird’s nest sometimes seen. Only one of these is correct. It matters which end of the cleat is turned first, how many turns are taken before crossing over, how many crossings are made, and which way the closing loop is formed. A proper cleat hitch has a simple and distinctive appearance. Like the bowline, a cleat hitch can work loose under tugging loads. Starting with a round turn about the base of the cleat can help to prevent this if the arms of the cleat are long enough.Pass the line first around the arm of the cleat farthest from the boat, then pass it around the other arm, twist the line to make a loop with the cleat end on top and the boat end on the bottom, and then slip the loop over the first arm.
Round
turn
When tying a round turn with two half hitches, note this quirk of nomenclature: One pass around an object is called a loop, two loops form a turn, and a round turn therefore consists of three loops, with the line passing two and a half times about the object. The two half hitches form a clove hitch around the standing part of the line, and this is perhaps the only way that a clove hitch ought to be used. Unlike a bowline, a round turn can be tied and untied with strain on the line.To tie instead an anchor bend, start the round turn with a long length of bitter end, and after taking the round turn, pass the bitter end around the standing part and under the round turn (so that the turns hold it fast under load) and then, after taking the two half hitches, either seize the bitter end to the standing part with stout twine or marline, or else secure the bitter end to the standing part with a bowline.
Thimble
splice
An eye splice is used to form a loop at one end of a rope. When using double braid, the easy alternative to an expensive or tedious eye splice is a thimble splice, which is basically a bowline around a thimble. Tie it as shown and then, to tighten it, hook the thimble over a sturdy hook, form a loop, and bounce your full weight on it. If using a metal thimble, spread the jaws slightly. Pass the unspliced end through the thimble to form a loop that is just as strong as an eye splice.